

到目前為止,寫了不少 Spring 的東西了,隨著使用的元件越來越多,需要設定的資訊也不少,哪些功能要做哪些設定?必須設定 Gradle、撰寫 build.gradle、決定依賴的程式庫、準備組態檔、初始相關資源等,雖然相對於從 Servlet/JSP 撰寫應用程式來說,這些準備工作已經算是輕鬆一些了,然而,不能再簡單一些嗎?
如果打算使用 Spring 來開發應用程式,Spring Boot 提供了快速初始專案的解決方案,透過自動組態、 Starter 相依程式庫、命令列介面等,可以省去初始專案過程許多繁瑣設定的工夫。
想要瞭解 Spring Boot,最好的方式就是直接使用,方式之一從命令列指令開始,也就是使用 Spring Boot CLI,這可以到 Spring Boot 官方網站,撰寫本文時,可在 Learn 頁籤中,找到各個版本的 Reference Doc,以 2.1.2 為例,可以在〈Installing the Spring Boot CLI〉下載 zip 檔案。
在解壓縮之後的資料夾中,bin 資料夾裏有 spring 指令,可以在 PATH 環境變數中加入 bin 資料夾的路徑,以便於使用指令。
要初始一個 Spring Boot 專案,方式之一是在 Spring Initializer 設定並下載,例如,建立一個基於 Web 的 hello 專案:
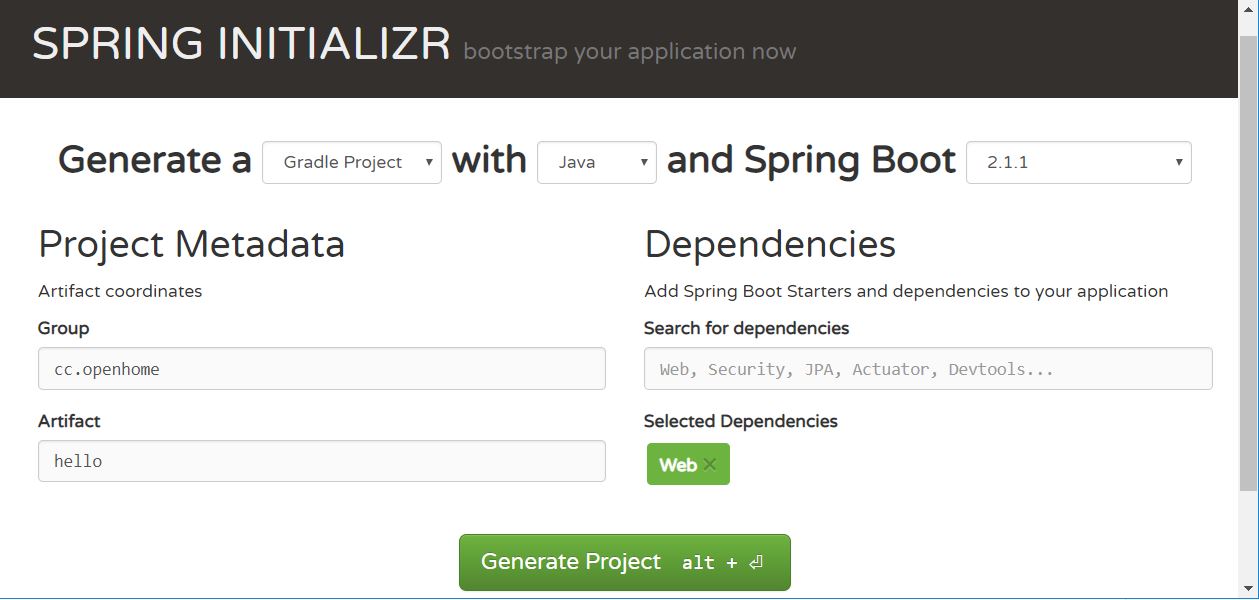
如圖設定並按下「Generate Project」之後,就可以下載 hello.zip,可將之壓縮至 C:\workspace,首先察看其中的 bulid.gradle 寫了什麼:
buildscript {
    ext {
        springBootVersion = '2.1.1.RELEASE'
    }
    repositories {
        mavenCentral()
    }
    dependencies {
        classpath("org.springframework.boot:spring-boot-gradle-plugin:${springBootVersion}")
    }
}

apply plugin: 'java'
apply plugin: 'eclipse'
apply plugin: 'org.springframework.boot'
apply plugin: 'io.spring.dependency-management'

group = 'cc.openhome'
version = '0.0.1-SNAPSHOT'
sourceCompatibility = 1.8

repositories {
    mavenCentral()
}


dependencies {
    implementation('org.springframework.boot:spring-boot-starter-web')
    testImplementation('org.springframework.boot:spring-boot-starter-test')
}
可以看到基本的 plugin 已經設定好了,之後可以在 Eclipse 中匯入這個專案,而在「dependencies」的部份可以看到 'org.springframework.boot:spring-boot-starter-web',Spring Boot 將開發 Web 時必要的相依程式庫,都整理在這個 Starter 相依之中,因此就不用像之前文件那樣,自行設定 spring-webmvc、spring-context 等相依程式庫,至於使用的 Spring 版本,決定於使用的 Spring Boot 版本,例如這邊使用的 Spring Boot 2.1.1 是基於 Spring 5.1.2。
接著可以察看一下 src\main\java\cc\openhome\hello 中的 HelloApplication:
package cc.openhome.hello;

import org.springframework.boot.SpringApplication;
import org.springframework.boot.autoconfigure.SpringBootApplication;

@SpringBootApplication
public class HelloApplication {

    public static void main(String[] args) {
        SpringApplication.run(HelloApplication.class, args);
    }
}
@SpringBootApplication 相當於標註了 @Configuration、@EnableAutoConfiguration 與 @ComponentScan,因此 HelloApplication 本身就是設定檔。
至於 @EnableAutoConfiguration 表示自動配置相關資源,Spring Boot 會自動看看相依程式庫設定,自動產生並注入元件(稍後會看到範例),這也是 Spring Boot 可以簡化設定的原因之一,在 Spring Boot 一開始感覺像是零組態,然而這並不是表示不需要任何設定,而是有許多設定都有預設值或行為了,在想要預設值以外的設定時,才需要進行相關組態。
這有好處也有壞處,如果你熟悉 Spring 的相關元件設定與運作,這會簡化你不少功夫,然而,像 Spring Boot 這類快速開發工具,你必須得經常與之相處,才有可能享受到快速開發的優點,因為它會有一套自己的指令、預設值以及不同於 Spring 本身的設定方式,久了不用一定會遺忘,有份好的文件,像是 Reference Doc,或者自己整理出一些常用指令、設定等,就很重要了。
就目前來說,你已經可以直接啟動專案了,不過,目前沒有任何路徑能提供資源,因此先來寫個控制器:
package cc.openhome.hello;

import org.springframework.boot.SpringApplication;
import org.springframework.boot.autoconfigure.SpringBootApplication;

import org.springframework.stereotype.Controller;
import org.springframework.web.bind.annotation.GetMapping;
import org.springframework.web.bind.annotation.ResponseBody;

@SpringBootApplication
@Controller
public class HelloApplication {
    @GetMapping("user")
    @ResponseBody
    public String user(String name) {
        return String.format("哈囉!%s!", name);
    }

    public static void main(String[] args) {
        SpringApplication.run(HelloApplication.class, args);
    }
}
現在這個 HelloApplication 也是個控制器了,當然,你也可以另外建立一個 .java,在其中標註 Controller、撰寫相關的程式碼等,就目前來說只是個簡單示範,就直接撰寫在同一個檔案了,目前使用 @ResponseBody 標註,因此回應實際上會是 JSON 格式,只不過這個 JSON 回應只有一個字串值罷了。
在文字模式下切換至 hello 專案,然後鍵入 gradle bootRun,首先會分析、下載相關的程式庫,接著啟動專案,你可以使用瀏覽器如下請求:

可以看到,你不用設置 Web 容器、不必設定 DispatcherServlet,不需要設定 WebConfig、RootConfig 之類,就可以直接運行應用程式了,相較於自行於 Eclipse 中建立 Web 應用程式,設定 Spring MVC 寫一個對應的功能來說,馬上就可以對比出使用 Spring Boot 的快速與方便性。
你不一定要到 Spring Initializer 建立專案,使用 Spring Boot 本身的 spring 指令,也可以建立初始專案,例如若執行指令:
C:\workspace>spring init -dweb --build gradle
Using service at https://start.spring.io
Content saved to 'demo.zip'
spring init 也是連線至 Spring Initializer 來產生初始專案,-dweb 指定了相依 Starter,如果不指定 --build gradle,預設會使用 Maven 作為建構工具,在不指定專案名稱的情況下,會使用 demo 作為名稱下載 demo.zip。
可以在某個資料夾執行 spring init 並附上 -x,這會在下載 zip 之後自動壓縮在所在的資料夾:
C:\workspace\hello2>spring init -dweb --build gradle -x
Using service at https://start.spring.io
Project extracted to 'C:\workspace\hello2'
或者是執行 spring init 時指定專案名稱:
C:\workspace>spring init -dweb --build gradle hello3
Using service at https://start.spring.io
Project extracted to 'C:\workspace\hello3'
若想知道更多 spring init 的使用方式,可以執行 spring help init 來查看協助訊息。